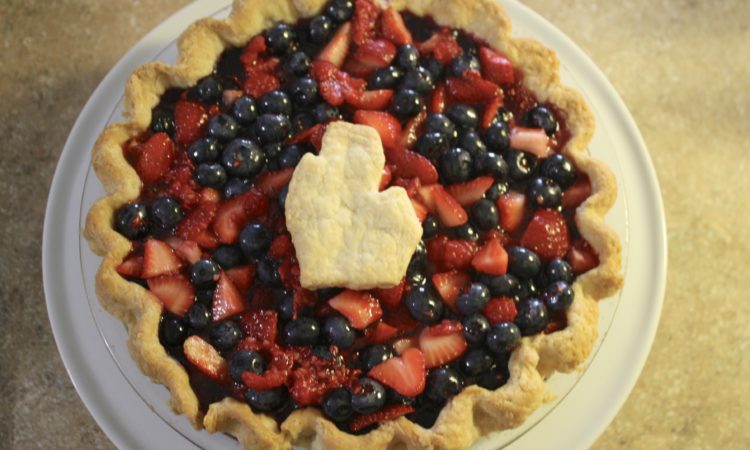
The Quotable Kitchen

Layered Buttermilk Biscuits

“Good bread is the most fundamentally satisfying of all foods; and good bread with fresh butter, the greatest of feasts.” - James Beard

IMG_7171

When I think of biscuits it brings to mind images of flaky layers, warm butter, and the subtle smell of honey. Biscuits are so versatile; they go with everything! I’ve eaten these biscuits for breakfast, with tea or coffee. I’ve also paired them with a salad for lunch, and the other night I served these as a side to a delicious chicken dinner we were having. This is definitely one of my favorite recipes to bake.

IMG_7183

It took me several attempts to get the technique down to creating the flaky layers, but once its mastered you’ll end up with perfectly layered biscuits each time! As with other bread recipes, there is some work required in rolling out the dough, folding the dough, and re-rolling it, but once you’re used to the method it’s easy to bake a batch of these biscuits in no time.

                              IMG_3217 IMG_3221

First you begin by rolling out the dough into a rectangle, then folding the layers over top of one another (like you would fold a piece of paper to fit into an envelope). Next you re-roll the dough into a rectangle, and again fold the layers.

IMG_7151

After repeating the above process, all that’s left to do is cut the biscuits. I’ve experimented with a few different sizes. I use a biscuit cutter that measures 2 & 1/2″ in diameter to yield 14 biscuits. If I want to make slightly larger biscuits I have another cutter that I’ll use which usually yields 10 biscuits. I haven’t tried making miniature biscuits but I’m sure when I do they will be adorable, because everything is adorable when its mini, except for the six dollar bag of popcorn at the movies. I mean, really? That much money for a small? Anyway – onto the biscuits recipe…

IMG_7186

Layered Buttermilk Biscuits

By Chef Kel, May 17, 2013

Layered Buttermilk Biscuits

Adapted from, Cooking Light Everyday Baking

Ingredients::

Instructions:

  • Preheat oven to 400°.
  • Weigh or lightly spoon flour into dry measuring cups; level with a knife. Combine flour, baking powder, and salt in a large bowl; cut in butter with a pastry blender or 2 knives until mixture resembles coarse meal. Chill 10 minutes.
  • Combine buttermilk and honey with a whisk, stirring until well blended. Add buttermilk mixture to flour mixture; stir just until moist.
  • Turn dough out onto a lightly floured surface; knead lightly 4 times (be careful not to overknead, it will create hard biscuits).
  • Roll dough into a (1/2-inch-thick) 9 x 5–inch rectangle; dust top of dough with flour. Fold dough crosswise into thirds (as if folding a piece of paper to fit into an envelope). Re-roll dough into a (1/2-inch-thick) 9 x 5–inch rectangle; dust top of dough with flour. Fold dough crosswise into thirds; gently roll or pat to a 3/4-inch thickness. Cut dough with a biscuit cutter to form 14 dough rounds.
  • Place dough rounds, 1 inch apart, on a baking sheet lined with parchment paper.
  • Bake at 400° for 12 minutes or until golden.
  • Remove from pan; cool 2 minutes on wire racks. Serve warm.
NUTRITION FACTS (from Cooking Light Everyday Baking): Serving Size, 1 biscuit - CALORIES 121, FAT 4.2g (SAT. 2.6g, MONO 1.1g, POLY. 0.2g), PROTEIN 2.4g, CARBOHYDRATES 18.4g, FIBER 0.5g, CHOLESTEROL 11mg, IRON 0.9mg, SODIUM 198mg, CALCIUM 63mg.

Artist’s Palette Cupcakes

 ”The greatest masterpieces were once only pigments on a palette.” – Henry S. Hoskins

IMG_6943
As our family’s ‘Birthday Season’  came to a close I knew I needed a recipe to match the creativity and artistry of the birthday honoree. This particular individual always prefers cupcakes, so that was the easy part of the recipe-finding process. As for creativity, I decided to fall back on a simple but fun display of an artist’s paint palette, which I thought was more than appropriate (considering that the birthday honoree was my boyfriend & he’s an artist!)

IMG_6947

I baked my classic yellow cupcakes for this recipe and decorated with vanilla buttercream frosting. The cupcakes turned out great! Everyone loved the display of bright colors and it was a good thing I snapped some quick pictures because the cupcakes were devoured quickly!

IMG_6939

The recipe calls for more frosting than might be needed, depending on how you want to decorate the cupcakes.  I had actually made this exact recipe about two years ago but it didn’t turn out nearly as good as it did this time around. I basically splattered the icing over the cupcakes which I suppose was artistic in it’s own way, but I’m much happier with the piping technique. Proof that yet again, practice makes perfect, and masterpieces can be created with practice, patience, and the right mixture of butter and sugar.

Artist’s Palette Cupcakes

By Chef Kel, May 8, 2013

Artist’s Palette Cupcakes

Adapted from, What's New Cupcake? By Karen Tack & Alan Richardson

Ingredients::

Instructions:

  • Divide the buttercream frosting evenly among six small bowls. Make sure to keep the bowls covered with plastic wrap to prevent the top from drying. 
  • Tint each bowl of frosting a different color with the food colors.
  • Matching the frosting color to the color of the paper liners, spread an even layer of frosting over the cupcakes (or pipe using a tip - I used Ateco tip #827).
  • Arrange the cupcakes on a painter's palette, if desired, and add a paintbrush for decoration.

Peanut Butter Dog Treats

“You can always trust a dog that likes peanut butter.” -Kate DiCamillo, Because of Winn-Dixie

IMG_6850

No matter how old my dog gets, I will probably always refer to him as my puppy.

IMG_6837

Despite the tiny gray hairs forming on his chin he continues to have more energy than I do on most days and even if he’s asleep he’ll wake up immediately if he smells peanut butter being spread onto a sandwich. When I first started baking homemade dog treats a few months ago, I loved it and I could tell that Marley did too. He’s always been my shadow when I’m in the kitchen but somehow he seems to know when I’m making treats for him. And if there’s peanut butter involved, he no longer blocks the kitchen entryway but lingers right at my feet waiting for me offer him some or let him lick the spoon. Peanut butter is definitely his favorite treat and he’ll do anything to get his paws on some.

      IMG_6852IMG_6851

And I always give in because, really, how can I resist such an adorable face?

IMG_6833

These treats will be a hit for any peanut-butter-loving-pup!

Peanut Butter Dog Treats

By Chef Kel, April 30, 2013

Peanut Butter Dog Treats

Adapted from, Paula Dean

Ingredients::

Instructions:

  • Preheat oven to 325°.
  • In a large mixing bowl, mix together the milk, egg and peanut butter with a hand mixer on medium speed until smooth. Add in the flour and baking powder to make a very stiff dough, using your hands to work in the last of the flour, if necessary.
  • Roll out dough to 1/4" thickness on a lightly floured surface. Cut into desired shapes and sizes.
  • Bake treats on a baking sheet lined with parchment paper for 30 minutes.
  • Remove from oven and allow to cool completely before storing in an airtight container.
  • Note: these treats can also be stored in the freezer for up to 3 months. After cutting out the shapes, freeze on a baking sheet for one hour, then place in a plastic freezer bag. To bake: remove from freezer and bake at 325° for 30-40 minutes until done.
  • Yield: About 50 dog treats (depending on size of cutter being used).

Mini Glazed Lemon Poppy Seed Muffins

“Spring is the time of plans and projects.” -Leo Tolstoy, Anna Karenina

IMG_6657

The month of April really seems to be flying by for me! Probably because as soon as the nice weather hit I felt as though I had lots of energy to tackle old projects, prepare new to-do-lists, and start planning for summer. While I should probably focus more of my attention on spring cleaning, I find myself instead focusing on what types of recipes I’d like to make for spring and summer. As I find myself browsing through my favorite cookbooks I forgot how much I missed certain flavors and fresh soon-to-be in season fruits (strawberry picking – here I come!)

IMG_6652

When I think of spring I always think of brightly-colored fruits and vegetables. Crisp greens, fresh oranges, and lemons of course. I don’t know if it’s the bright color or the tart flavor I love about lemons but when spring comes around I’m always eager to make a recipe including them. This year, a delicious lemon poppy seed muffin was the first recipe that came to my mind. These “pop-able” treats are full of lemon flavor topped with a sweet glaze: a great way to welcome in the spring season.

IMG_6663

These muffins were a huge hit with everyone, especially my co-workers. They would come into my office to tell me how good they were and on the way back to their office stop in the kitchen for “just one more…” – that to me is a sign of a great recipe.

Mini Glazed Lemon Poppy Seed Muffins

By Chef Kel, April 19, 2013

Mini Glazed Lemon Poppy Seed Muffins

Adapted from, Cooking Light Everyday Baking

Ingredients::

Instructions:

  • Preheat oven to 400° and line a mini-muffin pan with paper liners.
  • Combine flour and next four ingredients (through salt) into a medium bowl, stirring with a whisk until combined.
  • Add in the fresh lemon zest and the poppyseeds.
  • Make a well in the center and pour in the buttermilk, butter, and egg and stir just until moist.
  • Spoon batter into prepared muffin cups (fill 3/4 of the way full).
  • Bake for 10-12 minutes or until muffins are golden. Remove muffins from pan and place on a wire rack to cool.
  • In a small bowl prepare the glaze by whisking together the confectioner's sugar and lemon juice. Drizzle over muffins and serve.
NUTRITION FACTS (from MyFitnessPal): Yield, 36 servings, serving size 1 muffin CALORIES 60, FAT 1.0 (SAT 0.6, MONO. 0g, POLY 0.1g), PROTEIN 1.4g, CARBOHYRDATES 11.4g, FIBER 0.2g, SUGARS 7.2g, CHOLESTEROL 8.3mg, SODIUM 115.7mg.

Southwest Turkey Wrap

“It is more fun to talk with someone who doesn’t use long, difficult words but rather short, easy words like “what about lunch?” – Winnie The Pooh

IMG_6553

I try my best to save time and money by always making  lunches ahead of time. It takes a little bit of planning but it’s not too difficult. I think the somewhat challenging part is finding new recipes to try because eating the same thing over and over isn’t very exciting. So when I’m presented with the question of “what to eat for lunch?” and I can’t seem to find anything new to try, I usually take a different twist of a recipe I’ve tried before, which usually results in a delicious wrap!

IMG_6543

Wraps are easy to make, great to take on the go & there are plenty of ways to mix up the ingredients to keep things fresh. That’s why they make a daily apperance on the lunch menu around here, and I love finding new recipes that taste great & use ingredients I regularly have on hand. Plus, I love avocados and I’m always willing to try a recipe where it’s listed as one of the ingredients!

Southwest Turkey Wrap

By Chef Kel, April 6, 2013

Southwest Turkey Wrap

Adapted from, Meal Makeover Moms

Ingredients::

Instructions:

  • Spread two tablespoons of salsa over one whole wheat flour tortilla. Then arrange the cheese, turkey and avocado slices down the center of the tortilla.
  • Roll up the tortilla tightly and slice in half.
  • Repeat above steps with remaining tortilla, serve & enjoy!
NUTRITION FACTS (From myfitnesspal): Yield 2 servings, Serving Size 1 wrap - CALORIES 320, FAT 15.2g (SAT 3.5g, MONO. 5g, POLY. 1g), PROTEIN 19.5g, CARBOHYDRATES 29g, FIBER 6.5g, SUGARS 1.1g, CHOLESTEROL 32.5mg, SODIUM 1129mg,

Chicken & Cheese Enchiladas

“If God dwells inside us, like some people say, I sure hope He likes enchiladas, because that’s what He’s getting!” – Jack Handy, Deep Thoughts

IMG_6595

There are quite a few things I turn to when I’m stressed, but humor & food are probably the top two comforts I seek out. I don’t need to travel very far to find something humorous to lift my spirits, as my family and my crazy dog make me laugh more times a day than I can count. As seen here…

photo-20

Food, on the other hand, can be somewhat tricky, as I sometimes find myself wanting to dunk my head into a pot of something delicious without thinking it through.

IMG_6590

In the past when I would turn to food for comfort it would usually mean going to a fast-food restaurant. Thankfully today, I cook almost all my own meals and I’m still able to have my comforting foods, but in a much healthier way, for example: enchiladas! What’s not to love when it’s a tortilla rolled up with chicken & cheese? That’s surely comfort in my book.

 IMG_0213 IMG_0219

A few quick tips for making enchiladas: if you don’t make your own sauce (I haven’t tried that yet!) Look for a good quality brand, such as Trader Joe’s brand. It’s my favorite & I use it every time I make this recipe. Also, be sure to lay out all your ingredients ahead of time so it’s easier to assemble the enchiladas.

IMG_6597

Primed with a good recipe and fresh ingredients, it’s not hard to create meals that taste delicious but are also good for you. Plus, a quick internet search for the calories in fast-food enchiladas are enough to make me want to stay home (1,150 calories at On The Border and a whopping 1,423 calories at Cheesecake Factory…yikes!) I’ll happily stay home & cook this recipe many times to come.

Chicken & Cheese Enchiladas

By Chef Kel, April 5, 2013

Chicken & Cheese Enchiladas

Adapted from, Trader Joe's

Ingredients::

Instructions:

  • Preheat oven to 325°. Spray an 11 x 8 inch rectangular pan with cooking spray and pour a small amount of enchilada sauce in pan, just enough to coat the bottom.
  • In a large frying pan, heat the canola oil on low.
  • Pour 1/2 the bottle of enchilada sauce (about 1/2 cup) in a shallow dish (such as a pie plate) and set aside. Arrange onions, olives, cheese & chicken in a few small bowls and set aside.
  • Using tongs, take one corn tortilla and fry it in canola oil for 5 seconds. Remove from oil and dip it in the enchilada sauce until well-coated. Frying the tortilla for a few seconds prevents it from cracking.
  • On a plate, place the tortilla and add diced onions, sliced black olives, shredded cheese & chicken down the center of each tortilla.
  • Roll each tortilla, and place in prepared baking dish seam side down.
  • Continue above steps with remaining corn tortillas.
  • Pour the extra sauce from the bottle (or pie plate) over the enchiladas and top with remaining cheese.
  • Bake in oven, for about 10 minutes, until cheese is completely melted and enchiladas are warm.
  • Serve with rice, guacamole, salsa - the works!
NUTRITION FACTS (From MyFitnessPal): Yield 4 servings, serving size 2 enchiladas, CALORIES: 480, FAT 20.1g (SAT. 3.9g, MONO. 7.5g, POLY. 3.0g), PROTEIN 18.9g, CARBOHYDRATES 48.9g, FIBER 4.2g, SUGARS 2.4g, CHOLESTEROL 31.2mg, SODIUM 1170.4mg.

Chocolate Pudding Cookies with Cadbury Mini Eggs

“Sometimes I think that the one thing I love most about being an adult is the right to buy candy whenever and wherever I want.” -Ryan Gosling

IMG_6480

I don’t know about you, but before each holiday I love eating the seasonal candy the goes along with it. Holiday candy is one of my favorite ways to indulge in something sweet from time to time. For Halloween, mini snickers become a regular treat, for Christmas - peppermint bark is my go-to, and for Easter, well, you guessed it – Cadbury mini eggs! They’re a simple little treat, but they have always been a favorite of mine.

IMG_6446

After a holiday, however, I try to get rid of leftover candy as soon as possible because it’s way too tempting for me to have it around the house. Luckily – candy is an excellent way to add something different and fun to an ordinary recipe.

IMG_6461

This recipe incorporates chopped up Cadbury mini eggs right into the batter, along with some mini chocolate chips & chocolate pudding mix: it creates one delicious treat. My co-workers loved these cookies and so did my family. These cookies were a really nice way to wrap up the holiday (and use up the leftover Cadbury eggs so I wouldn’t eat them all!)

Chocolate Pudding Cookies with Cadbury Mini Eggs

By Chef Kel, April 2, 2013

Chocolate Pudding Cookies with Cadbury Mini Eggs

Adapted from, Two Peas & Their Pod

Ingredients::

Instructions:

  • Preheat oven to 350°. Line a baking sheet with parchment paper and set aside.
  • In a medium bowl, whisk together the flour, baking soda and salt. Set aside.
  • Using a mixer, beat together the butter and both sugars until creamy. Add in chocolate pudding mix, eggs, and vanilla extract. Mix until combined & smooth.
  • Add the dry ingredients into the wet ingredients and mix until just combined. Stir in the mini chocolate chips and the Cadbury mini eggs.
  • Drop cookie dough by rounded tablespoons onto prepared baking sheet. Bake for 10-12 minutes, or until cookies are set. Remove cookies from oven and let cool on baking sheet for 5 minutes. Transfer cookies to a wire rack to cool completely.
Note: Instant pudding can come in a few different sizes but the boxes are roughly anywhere from 3.4oz to 5oz. The pudding I use is in 4.5 oz box (Dr. Oetker) but the original recipe called for a 3.4 oz box. I always use Dr. Oetker brand & get delicious results each time.

Vanilla-Buttermilk Pound Cakes

“I ate a pound cake today, but I gained two.” – Jarod Kintz

IMG_5319

Happy National Pound Cake Day!

IMG_5357

That’s right – March 4 is National Pound Cake Day in the US! And the good news is – you don’t need to worry about gaining anything other than satisfaction with this lightened up recipe!

IMG_5373

It’s not difficult to see why the pound cake has a reputation for being dense and full of calories. The pound cake originally received its name because each cake contained one pound each of butter, sugar, eggs, and flour. Today we have recipe cards, recipe books, cook books, the internet…so it’s easy to find recipes but the original recipe was popular because it was easy to remember: the pound cake had a 1-1-1-1 ratio of the ingredients.  Needless to say, the original pound cake sounds like it was huge and I’m sure made more than enough servings for a family. That’s why it’s nice to have a lighter recipe on hand when you’re craving that rich flavor of a pound cake and want to share it with others!

IMG_5380

This recipe can be baked in five mini loaf pans, two regular sized loaf pans, or a combination of both! I love the mini pound cakes because they’re great to give as gifts & they’re also easy to freeze. You can also freeze individual slices. I wrap slices in plastic wrap then place in a ziplock freezer bag. When ready to eat, either thaw at room temperature, or heat in an oven on low.


Vanilla-Buttermilk Pound Cakes

By Chef Kel, March 4, 2013

Vanilla-Buttermilk Pound Cakes

Adapted from, Cooking Light Everyday Baking

Ingredients::

Instructions:

  • Preheat oven to 350°.
  • Weigh or lightly spoon flour into dry measuring cups, and level with a knife. Combine flour and next three ingredients (through salt); stir with a whisk. Place sugar, butter, and vanilla in a large bowl; beat with a hand mixer at medium speed unti light and fluffy. Add eggs, 1 at a time, beating well after each addition. Add flour mixture and buttermilk to sugar mixture, beginning and ending with flour mixture.
  • Spoon batter into 5 (5 3/43 x 3/ 3/4 inch) loaf pans coated with cooking spray, alternatively you could also bake in two (8 x 4 inch) loaf pans.
  • Bake at 350° for 40 minutes or until a wooden pick inserted into the center comes out clean. Cool n pans for 10 minutes on a wire rack. Remove from pans. Cool completely on a wire rack.
  • Yield: 30 servings total. If baking the 5 mini loaves, cut each into six slices. If baking the two large loaves, cut each into 15 slices.
NUTRITION FACTS (from CookingLight): Serving Size - 1 slice - CALORIES 144, FAT 5.1g (SAT. 3.1g, MONO. 1.4g, POLY. 0.2g), PROTEIN 2.2g, CARBOHYDRATES 22.3g, CHOLESTEROL 34mg, SODIUM 95mg.

Easy Green Smoothie

“Green strongly influences the heart and helps alleviate tension. Positive qualities associated with green are generosity, humility, and cooperation. Foods of the green vibration are all green fruits and green vegetables.” – Tae Yun Kim, The First Element: Secrets to Maximizing Your Energy

IMG_5873

 I’ve been wanting to try a green smoothie recipe for a while, but as much as I love smoothies it took me a little time to branch out try something new. Technically, an avocado is a fruit but I never thought about adding into a smoothie before, and I’ve discovered it’s another easy way to add a creamy texture without using yogurt. I also added in some pineapple chunks to the smoothie, which gives it a little tropical flavor (which is much needed during these dreary winter days!) This smoothie is packed with healthy monounsaturated (heart healthy) fats and plenty of antioxidants from the spinach, but the best part? It tastes great!

Easy Green Smoothie

By Chef Kel, March 3, 2013

Easy Green Smoothie

This recipe was given to me by one of my mom's co-workers (thank you!)

Ingredients::

Instructions:

  • Place all ingredients into a blender and process until smooth. 
  • Add more water depending on consistency (I like my smoothies creamy so I only used 1/4 cup water and 1 or 2 ice cubes).
  • Pour into a glass & enjoy!
NUTRITION FACTS (from MyFitnessPal): CALORIES 260, FAT 5.6g, 9 (SAT. 0.8g, POLY. 0.7g, MONO. 3.7g), PROTEIN 3.6g, CHOLESTEROL 0mg, SODIUM 32.3mg, CARBOHYDRATES  53.8g (FIBER 6.2g, SUGARS 35.4g).

Sweet & Salty Popcorn

 ”Of course life is bizarre, the more bizarre it gets, the more interesting it is. The only way to approach it is to make yourself some popcorn and enjoy the show.” – David Gerrold

IMG_5517

There are many ways to unwind from a busy or stressful week. I usually opt for reading a good book, browsing through cooking catalogues, working out at the gym, or one of my favorite ways to unwind: making a big batch of popcorn and watching a movie.

    IMG_5495

Popcorn has always been one of my favorite snacks. It’s a staple item if you’re going to the movie theatre, or a sports game, or any other type of event in a stadium (Cirque du Soleil!). On the weekends I love making it the “old fashioned way” on the stove top and adding in different spices or candies to make a delicious sweet & salty snack. This recipe can easily be doubled to make more, if needed.  And even though candy is candy, there are still ways to be snack healthier, by using options that are all natural. SunSpire and Unreal Candy are two of my favorite options.

IMG_5525

Sweet & Salty Popcorn

By Chef Kel, March 1, 2013

Sweet & Salty Popcorn

Adapted from, Taste of Home

Ingredients::

Instructions:

  • Cover a baking sheet with alumninum foil and spray with cooking spray; set aside.
  • Place a large pot on the stovetop and heat to medium-high.
  • Add 1 tablespoon of canola oil and swirl to coat the bottom of pot. Add one popcorn kernel. When the kernel begins to pop, add in the rest of the kernels. At this point you can shake the pot a little to make sure all kernels are coated with oil. Then place a lid over the pot and turn down heat to low.
  • When the popping starts to slow down, remove the pot from heat and when the popping stops all-together, transfer the popped popcorn to a large bowl. Set aside.
  • In a medium saucepan, combine brown sugar, light corn syrup and butter; bring to a rolling boil. Boil for 3 minutes, stirring occasionally.
  • Remove from heat; quickly stir in vanilla and baking soda until mixture is light and foamy. Immediately pour over popcorn; mix well. Add in nuts and mix until incorporated.
  • Bake, uncovered on prepared baking sheet for 30 minutes, stirring halfway through (15 minutes). Cool for 10-15 minutes and add in chocolate candies.
  • Divide mixture evenly into four serving bowls and snack happily.
NUTRITION FACTS (from myfitnesspal): Yield - 4 servings, Calories Per Serving - CALORIES 300, FAT 15.2 (SAT 7g, POLY 1.2, MONO 2.3), PROTEIN 5.1g, CHOLESTEROL 17.5mg, SODIUM 191.7mg, CARBOHYDRATES 41.3g,

Follow

Get every new post on this blog delivered to your Inbox.

Join other followers: